
From Mine to Masterpiece: Exploring the Silver Jewellery Journey
From Mine to Masterpiece: The Journey of Silver Jewellery
The glittering silver ring on your finger or the elegant pendant around your neck has a fascinating story. It’s a journey that transforms raw metal into a wearable work of art. Understanding this process gives you a deeper appreciation for the skill and craftsmanship involved. Making silver jewellery is not just about shaping metal; it involves a meticulous combination of metallurgy, design, and traditional techniques. The vast majority of silver jewellery is made using sterling silver, an alloy that is significantly stronger and more durable than pure silver, which is too soft for daily wear. This alloy is 92.5% pure silver and 7.5% other metals, usually copper, which is why it is often stamped as '925'. This detailed guide will walk you through the key stages of creating a beautiful piece of silver jewellery, from the initial concept to the final, polished product.

Key Stages in Silver Jewellery Manufacturing
-
Sourcing and Alloying the Metal:
The process begins with pure silver, often a byproduct of mining for other metals like copper.
- Pure silver is too soft, so it is alloyed to create sterling silver.
- The silver is melted, and a precise amount of copper is mixed in.
- The molten alloy is then cooled and shaped into manageable forms like sheets or wires.

-
Design and Model Creation:
Every piece starts as a design concept, either hand-drawn or created digitally using CAD (Computer-Aided Design) software.
- The digital design is used to create a physical model, often a wax model, using a 3D printer or specialized carving machine.
- This wax model is a perfect, full-size replica of the final jewellery piece.
-
Molding and Casting (Lost-Wax Method):
The wax model is attached to a central stem with other models, creating a "tree."
- This wax tree is then covered in a plaster-like material called investment and left to harden inside a flask.
- The flask is heated in a furnace, which melts and burns away the wax. This leaves a hollow cavity—a perfect negative mold of the jewellery.
- Molten sterling silver is then poured or vacuum-cast into this cavity.
- Once cooled, the plaster investment is broken away, revealing the rough silver jewellery pieces.
-
Filing, Grinding, and Assembly:
The cast silver pieces are cut from the main "tree" stem.
- Skilled artisans use files and grinding tools to smooth away rough edges and remove any excess metal.
- If a piece has multiple components (like a pendant and bail, or two halves of a bracelet), they are soldered together.
- Soldering uses a lower-melting-point silver alloy to securely join the parts.

-
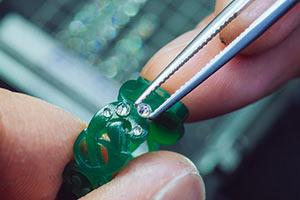
Stone Setting and Polishing:
If the design includes gemstones, the stones are carefully set into their mountings.
- This step requires great precision to ensure the stone is secure and the setting is flawless.
- The jewellery then undergoes several stages of polishing using various abrasive compounds.
- This process removes scratches and brings out the beautiful, bright luster of the silver.

-
Finishing and Quality Control:
Often, a final plating is applied, such as rhodium plating, to increase the shine and help resist tarnishing.
- The piece is then hallmarked or stamped, usually with "925," to certify its sterling silver quality.
- The finished item goes through a final Quality Control (QC) check to ensure there are no flaws and it meets the design and durability standards.
- Only after passing QC is the piece ready for packaging and sale.
